How to Make a Can Cooker Easy Survival Review
Hobo stoves are really simple stoves made from cans. They get their name because hobos and tramps used them during the Great Depression.
Hobo stoves have experienced a comeback in recent years. Here's what you need to know if you want to make a DIY hobo stove.
Table Of Contents
- 1 How to Make a Hobo Stove
- 1.1 What You Need:
- 1.2 Design 1: Basic Hobo Stove
- 1.2.1 Step 1: Decide which side will be up
- 1.2.2 Step 2: Punch flame holes/make pot stand
- 1.2.3 Step 3: Create air vents
- 1.2.4 Step 4: Cut out door
- 1.3 Design 2: Hobo Stove with Ash Stand (Method 1)
- 1.4 Design 3: Hobo Stove with Ash Stand (Two Can Method)
- 1.5 Design 4: Hobo Stove with Damper
- 1.6 Design 5: Hobo Stove Heater
- 2 What Makes Hobo Stoves So Great?
- 3 Potential Problems
- 3.1 So, when should you use one?
- 4 vs. Rocket Stove
- 4.1 Related
How to Make a Hobo Stove
There are so many ways to make a hobo stove. Everyone claims that their design is the "best." Rather than trying to present you with what I think is the "best," I'm going to give you several designs and let you experiment for yourself.
What You Need:
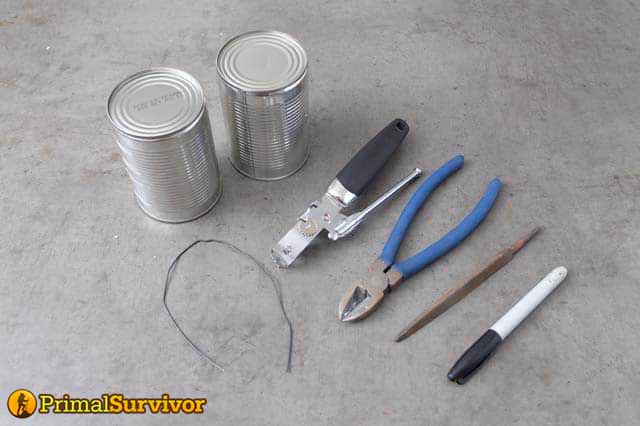
- A can (soup cans, tomato sauce cans, paint cans, and pretty much any type of can will work)
- A second soup can (if you want to make an ash stand)
- Punch-type bottle opener
- Something to cut the can with (ideally, you have tin snips; I get by with wire cutters)
- Nail and hammer
You'll also want a Sharpie for marking the can. A metal file is great for sanding down sharp edges.
Depending on the design, you might need another can, a piece of metal, or a piece of wire.
Design 1: Basic Hobo Stove
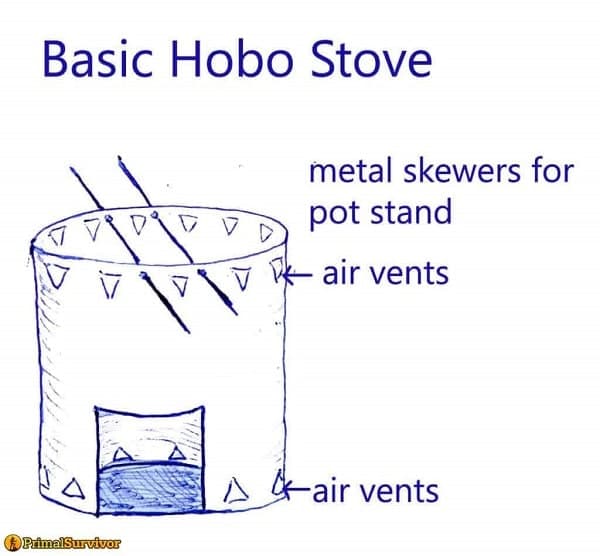
This is the most basic version.
Note: The most significant mistake people make with hobo stoves is not making enough air vents. Once the stove is full of sticks and has a pot on top of it, airflow will be hindered. So don't skimp on the vents!
Step 1: Decide which side will be up
Traditionally they are made with the top of the can upwards. The bottom of the can stays in place. This allows the stove to be sturdier. The bottom of the can will also catch embers, which makes it safer to use indoors.
However, it is a lot easier to cut out a door when the top of the can is downwards. You remove the lid and start snipping the door away (if you don't do it this way, you'll have to create a hole in the can so your tin snips have an entry point). When the top of the can is upwards, you can use it as a cooking surface for your pot – no other pot stand is required!
Another benefit of leaving the bottom of your hobo stove open is that it's easier to create a fire in it. You can start the fire outside of the stove, get some good coals going, and then set the hobo stove on top of these coals.
Top of can upwards:
- Bottom stays intact, making the stove sturdier.
- The bottom of the can will catch embers, making it safer to use indoors or around dry brush.
- It's harder to cut a door in the can. You'll have to create a hole in the can so your tin snips have an entry point.
Bottom of the can upwards:
- Creating the door is easier
- The bottom of the can serves as a pot rest – just punch some flame holes in it.
- Can create the fire outside of the stove, then just set the stove on top of it.
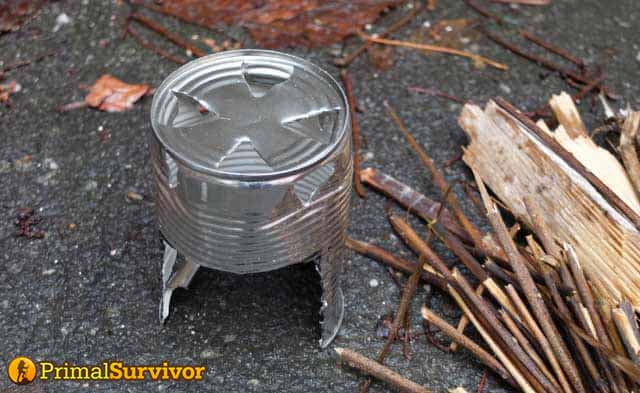
Step 2: Punch flame holes/make pot stand
If the bottom of the can is upwards, you'll need to punch some holes to allow flames through.
If the top of the can is upwards, you may need to make some holes for metal skewers to go through. These will be your pot stand.
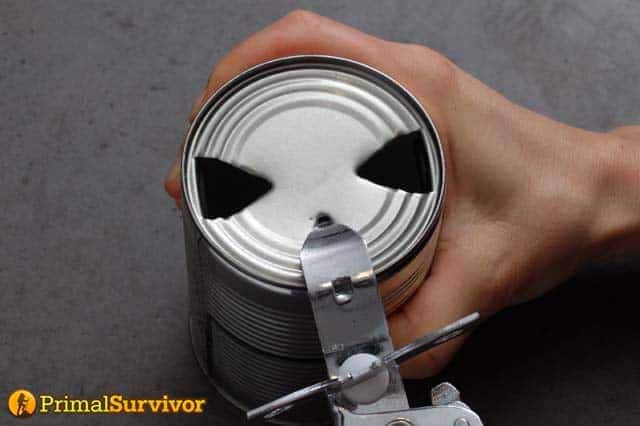
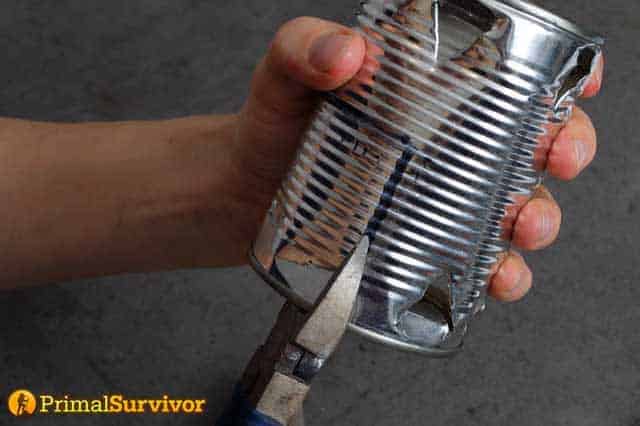
Step 3: Create air vents
Punch air vents all along the top and bottom of the can. To make them evenly spaced, I will make a hole on one side and then make a hole exactly opposite it. Then I make holes on the sides.
On my small soup can stove, I could only make 4 vents on the top and another 4 on the bottom. My bottle opener is huge, though.
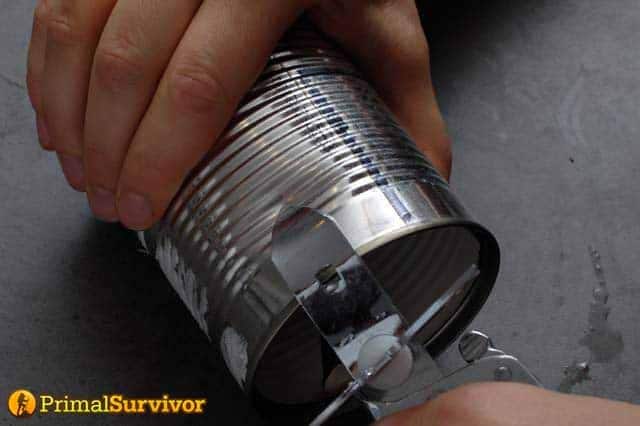
Step 4: Cut out door
Draw the door on your can. Then cut it out. This will be the most challenging part! I like to have a fairly large opening so that I can get sticks inside. However, you don't want the door to be so large that the can loses stability.
Design 2: Hobo Stove with Ash Stand (Method 1)
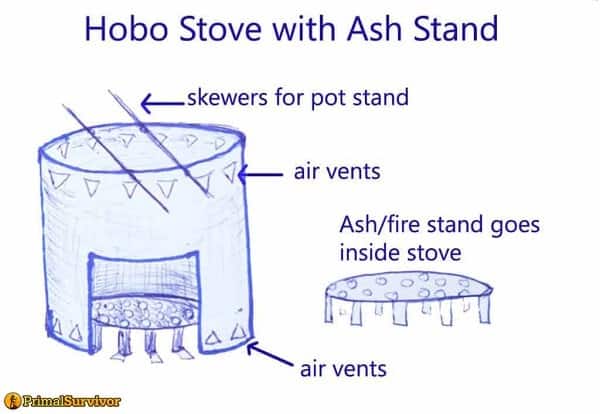
I like this hobo stove design best because it is easy but works much better than the basic hobo stove. This works best with a LARGE CAN like a paint can. However, you can still use this method with a smaller can.
You will need an extra piece of metal for this hobo stove design.
- Step 1: Create a basic hobo stove out of your can
- Step 2: Make the ash stand
- Get a piece of metal; it should be circular and larger than the circumference of your stove
- Trace the hobo stove in the middle of the metal piece
- Using a hammer and nail, create many holes in the metal circle you just drew.
- Widen the holes with a screwdriver or other sturdy object. The holes need to be big enough for ash to fall through but not so large that the embers will fall through.
- Create legs for the stand. Do this by cutting slits in the metal around the circle you drew.
- Fold every other slit downwards to create your legs
- Step 3: Insert the ash stand
Design 3: Hobo Stove with Ash Stand (Two Can Method)
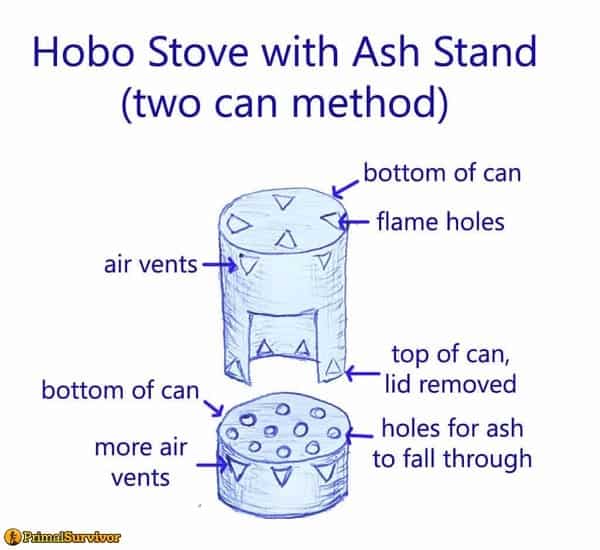
Cans are designed so they can be stacked on top of other cans of the same size. You can take advantage of this feature to make an ash stand.
It's a lot easier than the method above (though that method isn't exactly difficult either 😉
- Step 1: Create a basic hobo stove: The BOTTOM of the can should be upwards! Otherwise, the cans won't stack right.
- Step 2: Create ash stand out of second can
- In the bottom of the can, punch holes. I used a nail/hammer to create the holes and then widened the holes with a metal tool.
- Punch air vents along the edge of the bottom
- Optional: Cut the can, so it is shorter. If the ash stand is too tall, then the hobo stove won't be very stable.
Design 4: Hobo Stove with Damper
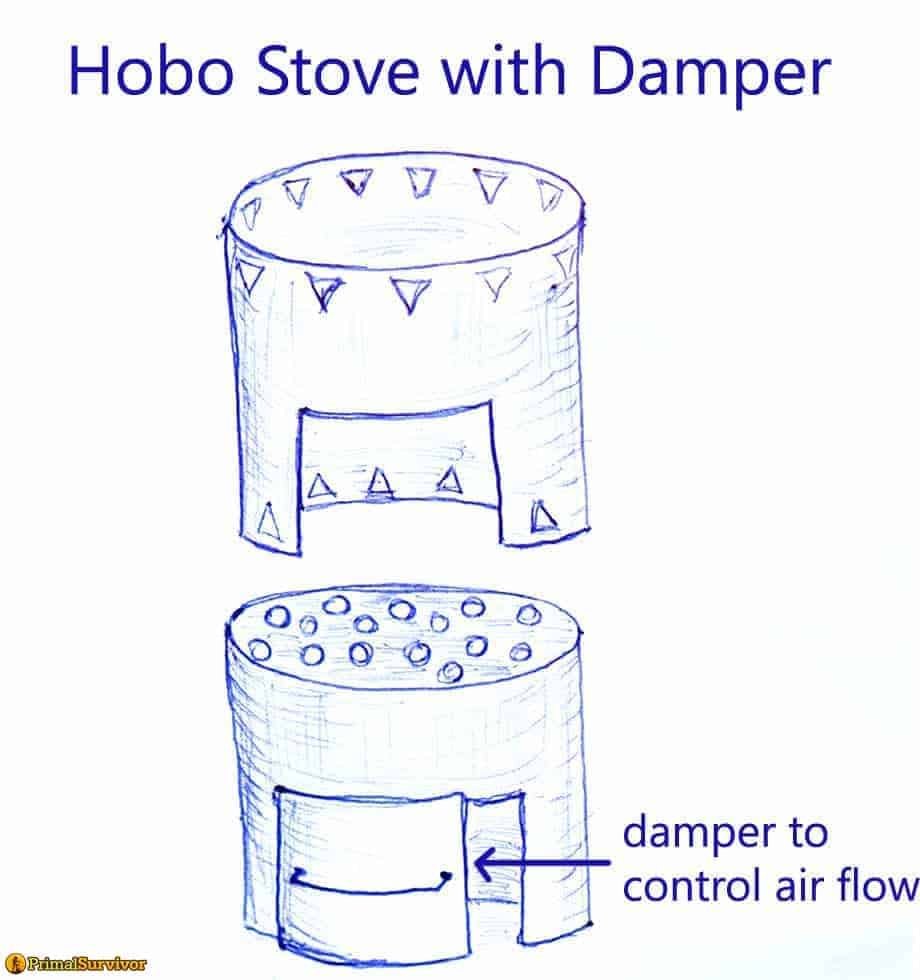
The second biggest issue with hobo stoves (after the flame going out due to inadequate airflow) is that you can't control the flame easily.
One solution to this is to create a "damper" – or a little door on your ash stand which can be open/closed for better airflow.
- Step 1: Create basic hobo stove
- Step 2: Make your ash stand: In the diagram, I've used a second can to create the ash stand (as in design 3). The only difference here is that I cut out a door for air to flow into.
- Step 3: Make your damper: If you are careful when cutting out the door to your hobo stove, you can use this piece of metal for the damper. It helps to make a handle on the damper for moving it back/forth over the door.
Using the Damper: When using a damper, the damper-door goes towards the wind. The fuel-door goes AWAY from the wind.
Design 5: Hobo Stove Heater
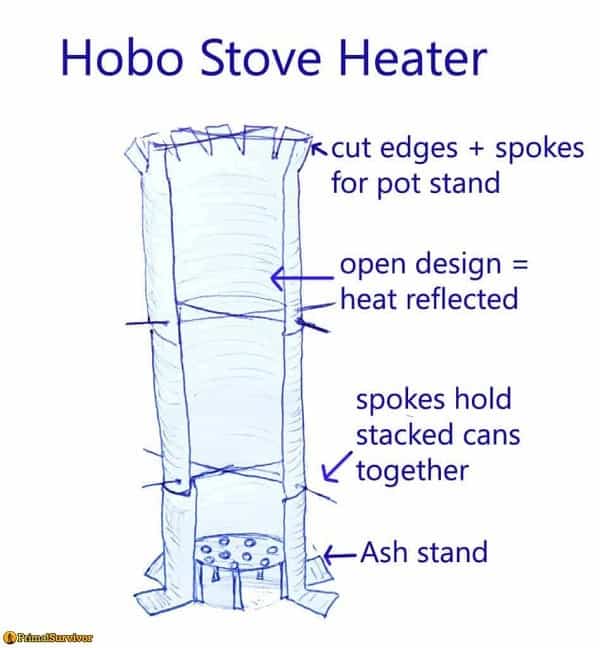
I haven't tried this design personally, but it looks fantastic. I found it here on a biking forum.
The hobo stove heater is made out of 3 large cans stacked together with spokes. The cans have been cut open, so the fire heat is reflected back towards you.
I can see some obvious problems with this design – like the fact that it is not portable and thus not practical for many situations. However, if you were hunkered down in one location for a long time (such as an abandoned building), this heater would be great.
What Makes Hobo Stoves So Great?
Even though they are so simple, hobo stoves work very well. You can use them for cooking food or boiling water. With some design modifications, you can even use them as a heater.
Compared to other types of survival stoves, hobo stoves have these benefits:
- Make from any type of can, including aluminum soda/beer cans, soup cans, paint cans, and even metal trash cans
- Ability to use multiple types of fuel in them. Usually, sticks or scraps of trash are used. However, you can also put a "tuna can stove" or "buddy burner" inside them as the flame.
- Cheap: Make out of found materials without having to buy anything
- Easy to make: It helps to have some tools; however, you can make a very basic one with nothing more than a can opener, hammer, and nail. Or with just your knife.
Potential Problems
While I love hobo stoves and the DIY philosophy behind them, they aren't all that they are hyped up to be.
Here are just some of the possible issues:
- It isn't easy to control the flame
- You'll burn the hell out of your pot (don't use a pot that has plastic handles!!!)
- The fire often goes out because of poor airflow
- It can take forever to boil water
- You have to feed the fire constantly
- They often make a lot of smoke
- Your pot will get all greasy, especially if using scraps like newspaper to light the fire
Personally, I would never intentionally use a hobo stove in everyday situations.
When backpacking in the wilderness, I use a gas canister stove. They burn hotter, and you can easily control the flame. Boiling water/heating food is much faster than with a hobo stove!
My Primus stove (Amazon Link) boils 1/2 liter of water in less than 3 minutes!
By contrast, it took 17 minutes to boil 1/2 liter of water on my hobo stove!
If I needed an alternative cooking method in the wild (such as if I ran out of fuel), I still wouldn't use a hobo stove.
I'd probably use a method for cooking over a campfire – such as by making a "crane" (if my pot had a handle) or cooking over a hot rock (if the pot didn't have a handle).
Editors Note – Tip from reader Whitemarlin:
If you want to keep your pots looking clean and shiny, spread dish soap on the pan's bottom and sides, allow to dry, use on fire, wash the soap, and the black off after using.
So, when should you use one?
Yes, I know that there are a lot of survivalist types who go backpacking with their hobo stoves.
The Emberlit stove, Firebox Nano, and Vargo Hexagon stove are fantastic because they fold flat and are very light.
However, I would only recommend hobo stoves for URBAN survival situations such as when:
- You can't make a large campfire (because it might draw attention or fires are prohibited)
- There isn't much wood and you have to use scraps of cardboard or trash for fuel
- Professional stoves will get stolen. You can almost always find a can to make a hobo stove out of!
- You are in a large, well-vented abandoned building (an alcohol stove will be much better indoors because it makes less smoke).

vs. Rocket Stove
A rocket stove is another type of survival stove that can be made out of cans. Instead of using just one can, a rocket stove uses two cans. The first can is the "flue." The second can goes inside the "flue" and is where you put the fuel.
I prefer hobo stoves over rocket stoves. It only requires one can, and you get better airflow. However, rocket stoves can also be made from many other materials – such as stacked-up bricks, cinder blocks, and clay. You can also get a much larger fire going inside of a rocket stove.
You can check out 9 DIY rocket stove designs here.
- Read more about emergency indoor stoves (and how to use them safely.)
- Read about more DIY survival gear projects.
So, there you have it — 5 stove designs. Have you made one? Which design did you use? Let us know in the comments!
Source: https://www.primalsurvivor.net/hobo-stove/
0 Response to "How to Make a Can Cooker Easy Survival Review"
Post a Comment